Updated
Go to Lead Widget in the sidebar.
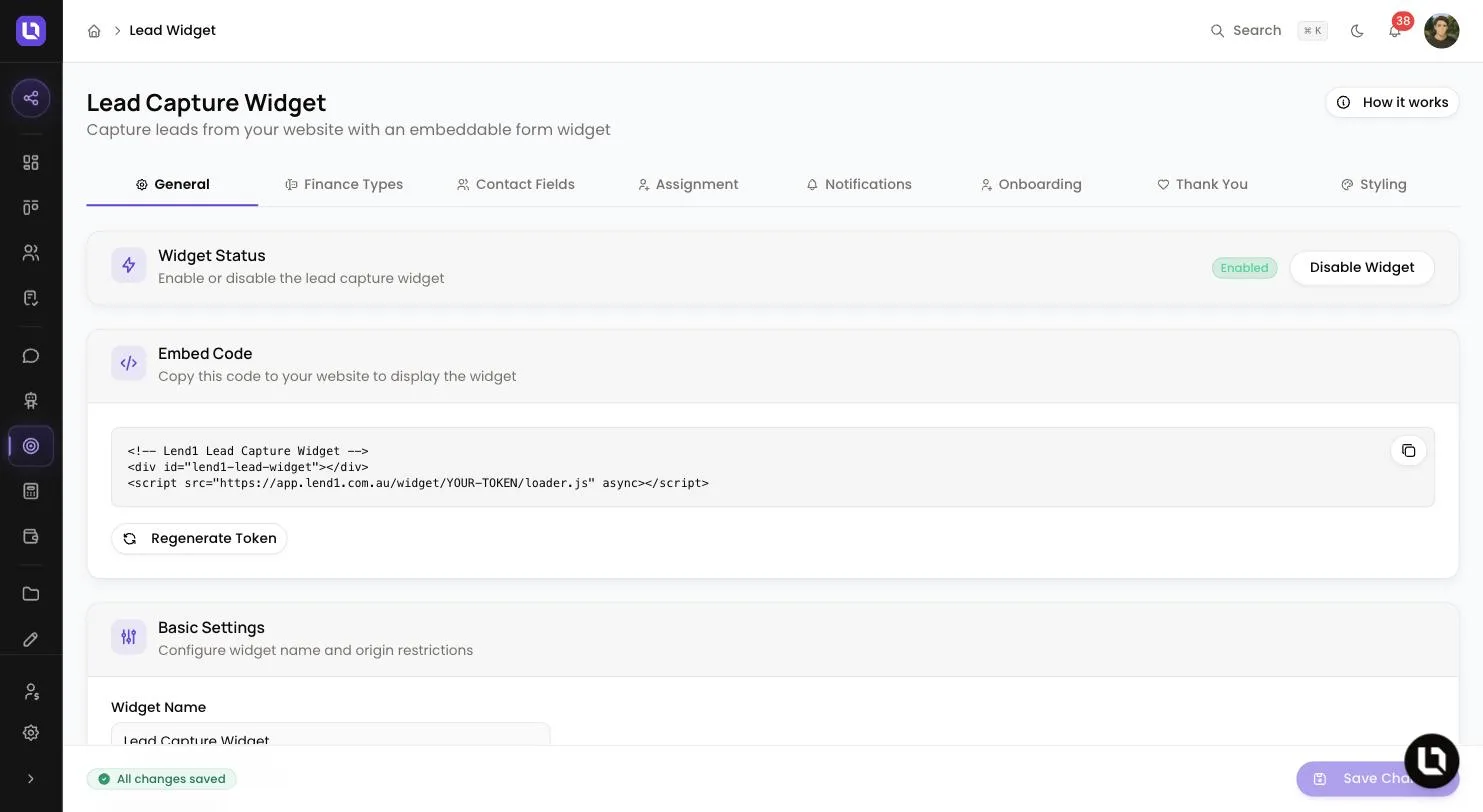
The Lead Widget is a short enquiry form that sits inside a page of your own website. Lend1 turns each submission into a contact and a deal, assigns the deal by your rules and notifies your team. Each workspace has one widget, installed with one snippet.
Before you start
- You need two permissions. View Chatbots shows Lead Widget in the sidebar and opens the page. Manage Lead Widget loads and saves its settings. The Admin role has both. A custom role needs both, granted under Settings > Roles & Permissions. See Creating custom roles and permissions.
- The Lead Widget is included in Pro and Enterprise. On Starter it stays in the sidebar, dimmed, with a crown, and opens a page headed Included in Pro and Enterprise. See Managing your plan and billing.
- You need to be able to add HTML to your website.
What a visitor sees
- "What type of loan do you need?" lists the finance types you have switched on.
- A type with sub-types asks which one. Home Loan offers Purchase, Refinance and Construction.
- "Tell us more about your needs" asks for the Loan Amount.
- "Your contact details" collects the contact fields you chose and, when switched on, a privacy consent tick box. The visitor selects Submit.
- The thank you screen shows your title and message.
Set up the widget
The page is headed Lead Capture Widget. After changing a tab, select Save Changes before you open the next one.
Below is a table of tabs and what each one sets.
| Tab | What it sets |
|---|---|
| General | Widget Status, the Embed Code, Widget Name (internal only) and Allowed Origins. |
| Finance Types | A switch and an editable label for each type. Home Loan, Car Loan and Personal Loan start on. Business Loan, Equipment Finance and Insurance start off. |
| Contact Fields | Switch First Name, Last Name, Email and Phone on or off, and mark each Required or Optional. Phone starts optional. Email is always required. |
| Assignment | Assignment Type: Unassigned (manual assignment) (the default), Assign to specific user with Assign To, or Round-robin assignment with a User Pool. |
| Notifications | Email Notifications and In-App Notifications. Both start on. |
| Onboarding | Enable Auto Onboarding sends an onboarding portal invite after each submission by Email or SMS. Starts off. |
| Thank You | Title (starts as "Thank You!") and Message. Enable Privacy Consent starts on, with Consent Text and Privacy Policy URL. While it is on, Lend1 refuses a submission without the tick. |
| Styling | Primary Color, Border Radius, Custom CSS and the Live Preview. |
Please note: under Allowed Origins, list the websites that may show the widget, one URL per line. With none added, Lend1 uses your business website from Settings.
Preview it
- On the General tab, select Enable Widget. Lend1 allows this only when at least one finance type and the Email field are switched on.
- Open the Styling tab and scroll to Live Preview. Use the desktop and mobile buttons to check both widths. The preview is the real form, so submitting it creates a lead.
Install it on your website
Step 1: Copy the code
- On the General tab, under Embed Code, select the copy button. The code looks like this:
<!-- Lend1 Lead Capture Widget -->
<div id="lend1-lead-widget"></div>
<script src="https://app.lend1.com.au/widget/YOUR-WIDGET-TOKEN/loader.js" async></script>
Step 2: Paste it into your page
- In your website editor, add a block that accepts raw HTML. Paste the code where the form should appear, then save and publish. The form fills the width of that block and sets its own height.
- Later changes to your settings apply without pasting the code again.
Please note: Regenerate Token invalidates the current code. "You will need to update the code on all websites using this widget."
Congratulations! Your enquiry form is live and every submission lands in Lend1.
What happens when a lead comes in
- Contact. Lend1 looks for an existing contact with the same email, then the same phone number. A match is linked as it is and its details are not overwritten. Otherwise Lend1 creates a contact with the source Website Widget.
- Deal. A new open deal is created for that contact, titled with their name and the finance type. The loan amount becomes the deal's value, and the deal is assigned by your Assignment tab.
- Notifications. The assigned team member is notified. If the deal is unassigned, the person who first set up the widget is. The in-app notification opens the deal. The email is skipped for anyone who has turned off Email for System Alerts in their notification settings. See Choosing your notifications.
- Automations. The Deal Created trigger fires for every lead, and Contact Created fires when the contact is new.
Find the lead on the Deals page and the person under Contacts.
<!-- screenshot pending: lead-widget-new-deal.webp (a deal created by the widget, showing its title, value and assigned broker, with false client data) -->Turn it off
- On the General tab, select Disable Widget. The form stops loading on your website and submissions are refused. Your settings and code are kept, and Enable Widget brings it back.