Updated
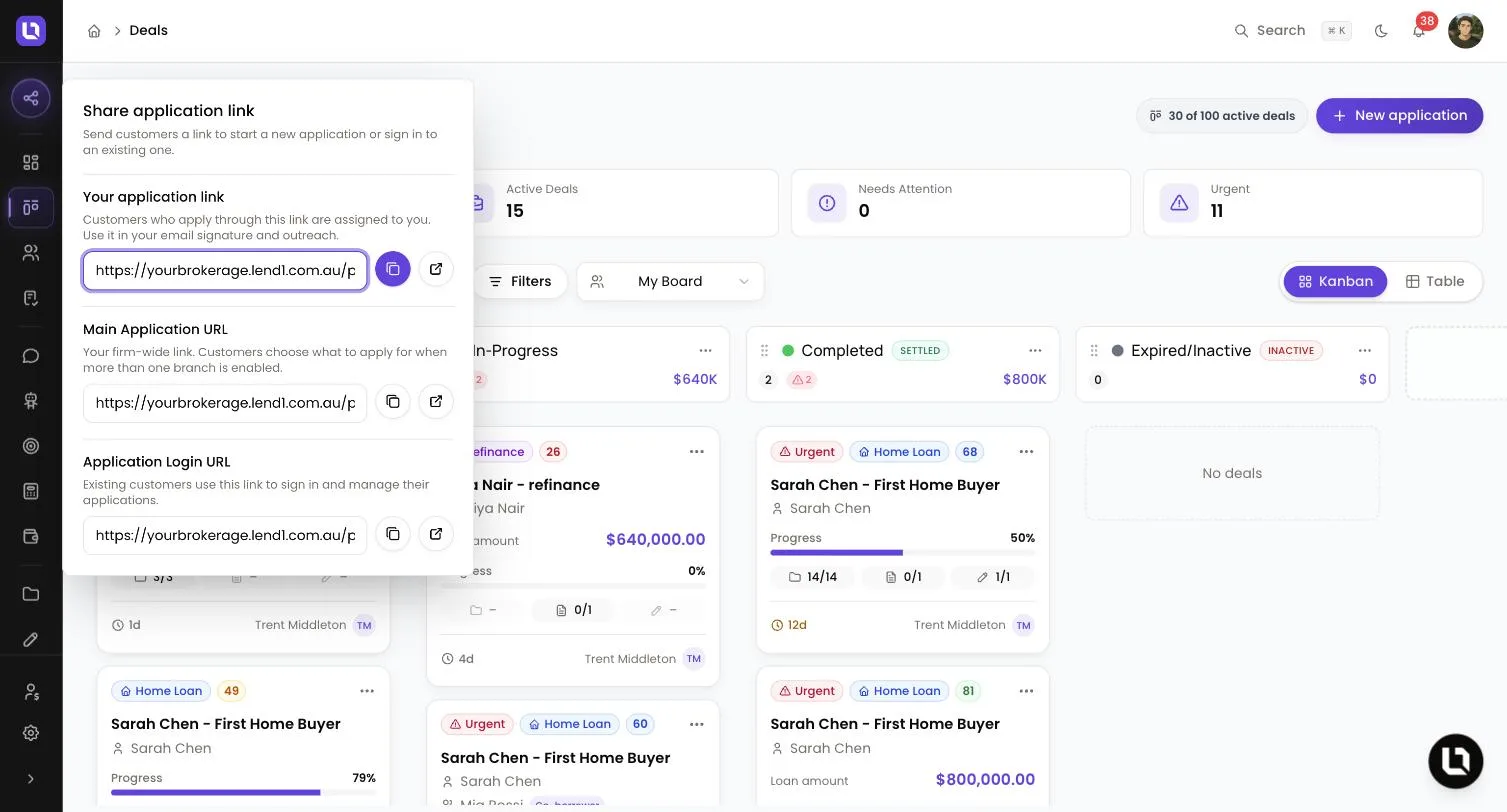
Select Application link at the top of the sidebar.
Your application link is one address anyone can use to start an application with you. A client opens it, confirms their email or mobile number, and Lend1 creates the deal and assigns it to you.
An onboarding invite is different. It goes to one named client, opens without a code and expires after 14 days. See Sending a client an onboarding invite.
Before you start
- Every team member has the Application link button and their own personal link. No permission is needed.
- Your personal link is created the first time you open the popover or Settings > Profile. Nobody else can create it for you.
Copy your link
Step 1: Open the popover
- Select Application link. With the sidebar collapsed, it is the share icon labelled Share application link.
Step 2: Copy the link you need
- The Share application link popover opens with Your application link already selected. Select the copy button beside it. Lend1 confirms with "Link copied".
- The button next to it opens the link in a new tab.
Below is a table of the links in the popover and what each one is for.
| Link | What it is for |
|---|---|
| Your application link | Your personal link. Applications started through it are assigned to you. |
| Main Application URL | Your firm-wide link. Clients choose what to apply for when more than one branch is enabled. |
| Application Login URL | Existing clients use this link to sign in and manage their applications. |
Please note: links that go straight to one branch are under Share Portal on the Onboarding Portal page. See Customising your onboarding portal.
Put your link wherever clients already find you, such as your email signature, a button on your website or a social profile.
Change your link name
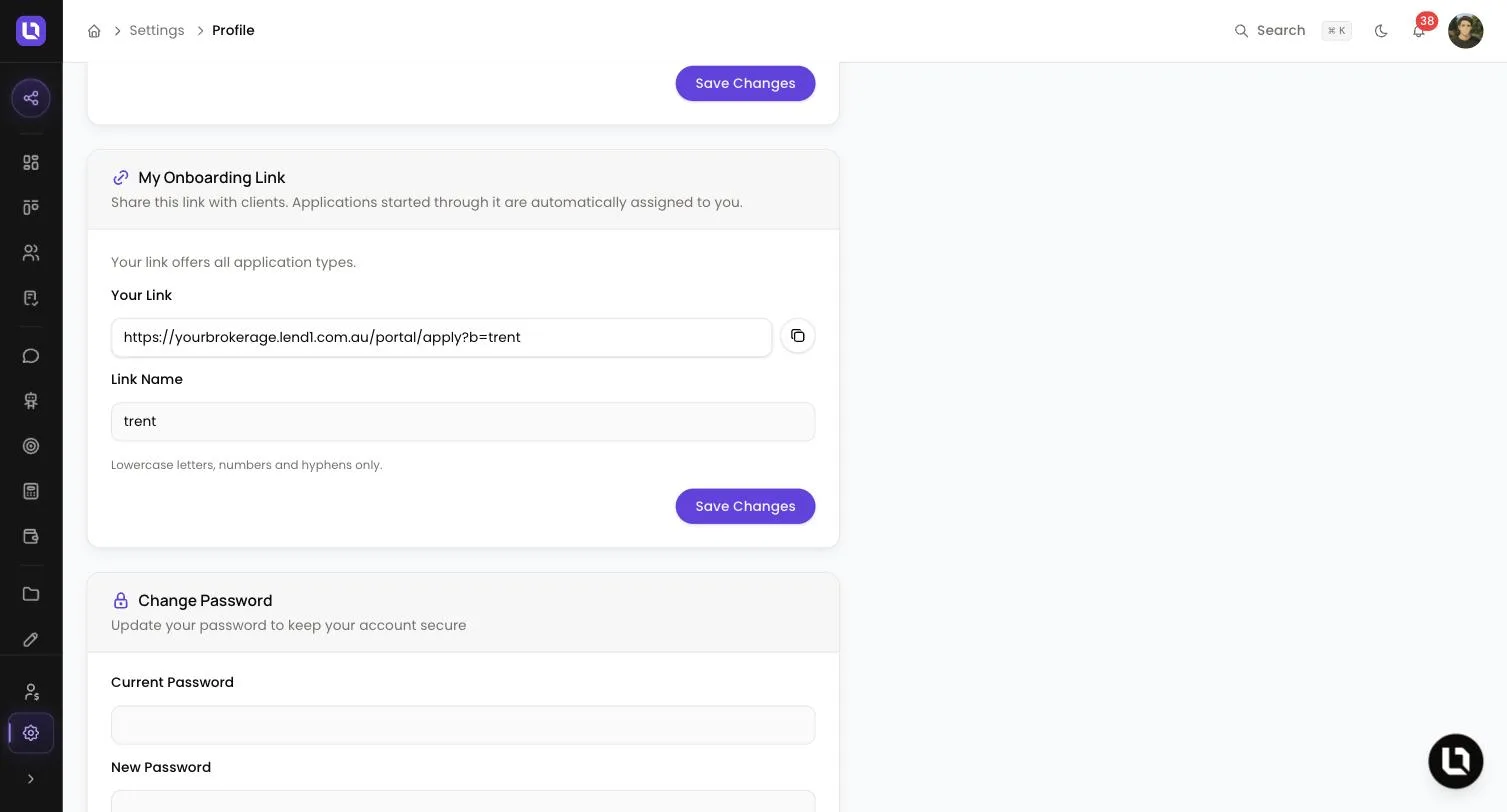
Your link ends in ?b= followed by your link name, which Lend1 builds from your first name.
Step 1: Open your profile
- Go to Settings > Profile and find My Onboarding Link.
Step 2: Rename it
- Link Name: lowercase letters, numbers and hyphens only, from 2 to 60 characters. If a colleague has it, Lend1 shows "That link name is already taken."
- Select Save Changes. Lend1 confirms with "Onboarding link updated".
Please note: a link that still uses the old name opens the application, but the deal arrives unassigned.
The link uses your custom domain once that domain is active, otherwise your Lend1 subdomain. An admin with Manage Team can limit which branches your link offers under Broker Links on the Onboarding Portal page.
What your client sees
- With more than one branch on offer, they first answer What would you like to apply for? With a single branch they skip this.
- On Let's get started they enter their email or Australian mobile number and select Continue.
- Lend1 sends a 6-digit code to that address or number. They type it on Enter your code. The code lasts 10 minutes and allows 5 tries, and Resend code unlocks after 30 seconds.
- A new client goes into the application. The Choose Your Broker step is skipped because the deal is already yours.
- A client with an application in progress sees Welcome back, with Continue for each one and Start a new application underneath.
What Lend1 creates
Nothing is created until the code is verified. Then Lend1 creates:
- A contact with the source Onboarding Portal. If the email or mobile already matches a contact in your workspace, that contact is used instead.
- A deal assigned to you. It lands on the stage set in the branch's Deals created go to setting, or your first pipeline stage if none is set.
You and any team members who support you get an in-app notification when the application starts, and another plus an email when it is completed.
If you have your own default privacy document under Settings > Compliance, and the Privacy Sign step is left on Default privacy document, the step shows yours in place of the company version. See Setting up your compliance documents.
Please note: continuing an existing application never changes who its deal is assigned to, whichever link the client used.
Personal link, company link or invite
Your application link assigns the deal to you. Below is a table of the other ways to start a client and what each one does.
| Option | What it does |
|---|---|
| Main Application URL | Anyone can use it. The deal is unassigned unless the client picks a broker on a Choose Your Broker step. Until it has an owner, notifications go to people who can view all deals. |
| Onboarding invite | Sent to one client by email or SMS. It opens with their details filled in and no code, and the deal is assigned to whoever sent it. |
When someone leaves your team
When a team member is deactivated under Settings > Team, their link still opens the application. It offers every enabled branch and the deal arrives unassigned, the same as the Main Application URL.
Congratulations! Your link is ready to share.