Updated
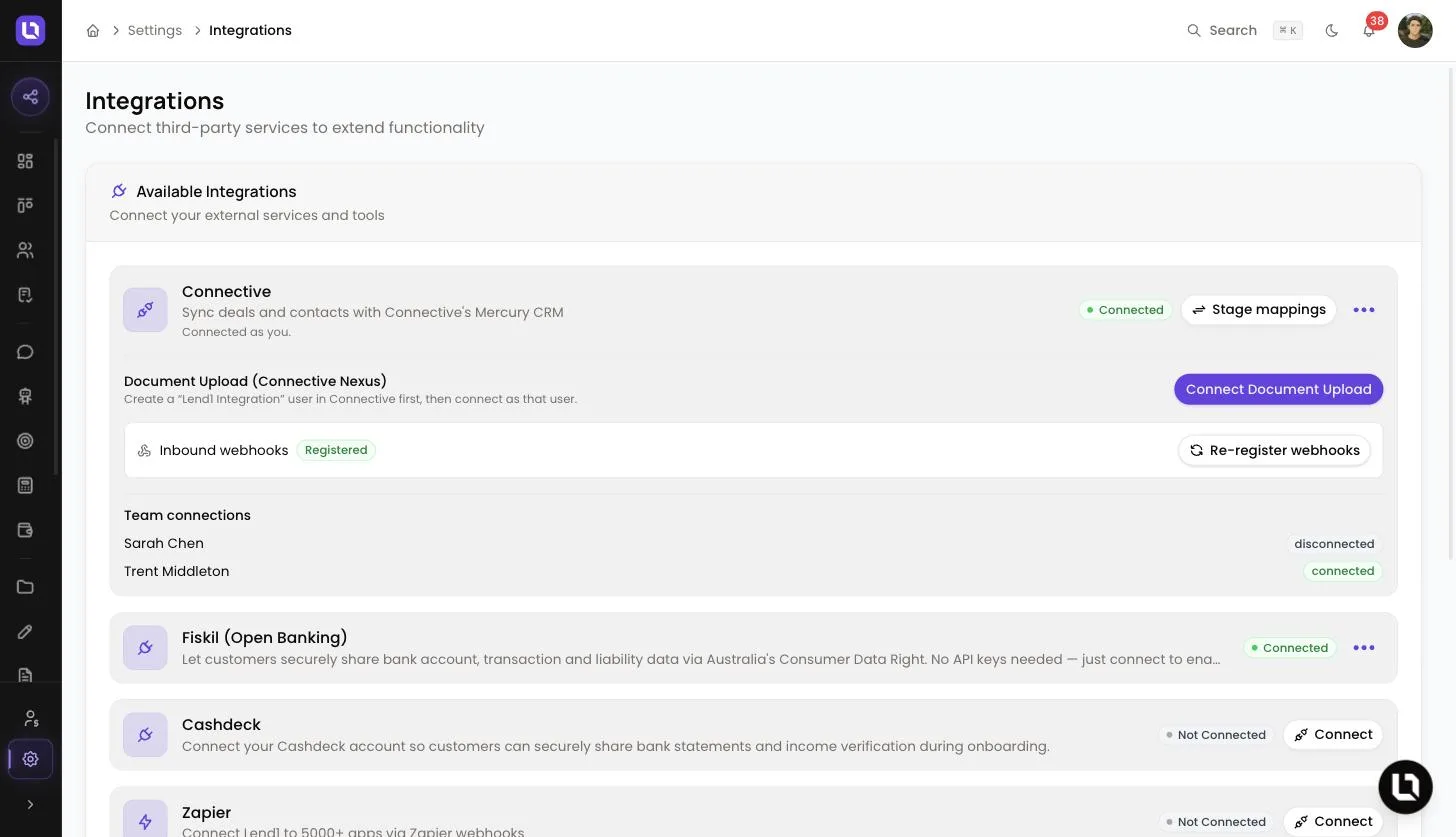
Go to Settings > Integrations and find Connective in the list.
The Connective integration keeps Lend1 and your Mercury Nexus CRM in step. Deals become opportunities, contacts become people, and notes, tasks, stage changes and documents follow them across. Changes made in Connective flow back the other way, so the deal you see in Lend1 matches the opportunity your aggregator sees.
The connection is personal. Each team member connects their own Connective account, and a deal syncs through the account of the broker it is assigned to. A deal assigned to someone who hasn't connected won't sync until they do.
Before you start
- Connecting your own account needs the Connect Own Integrations permission, which the default Broker role has, or Manage Integrations. If you can't see Integrations under Settings, ask an admin to grant one of those under Settings > Roles & Permissions. See Creating custom roles and permissions.
- Have your Connective CA number ready. Lend1 asks for it when you connect, and Connective assigns your opportunities and tasks to that agent.
- Have your Mercury API key and API token ready. The next section shows where they live in Mercury Nexus.
- Document upload needs a one-off setup on Lend1's side for your brokerage before it can be connected. Contact us to arrange it, and create a dedicated user in your Connective account named along the lines of "Lend1 Integration" to sign in with.
Find your Mercury API details
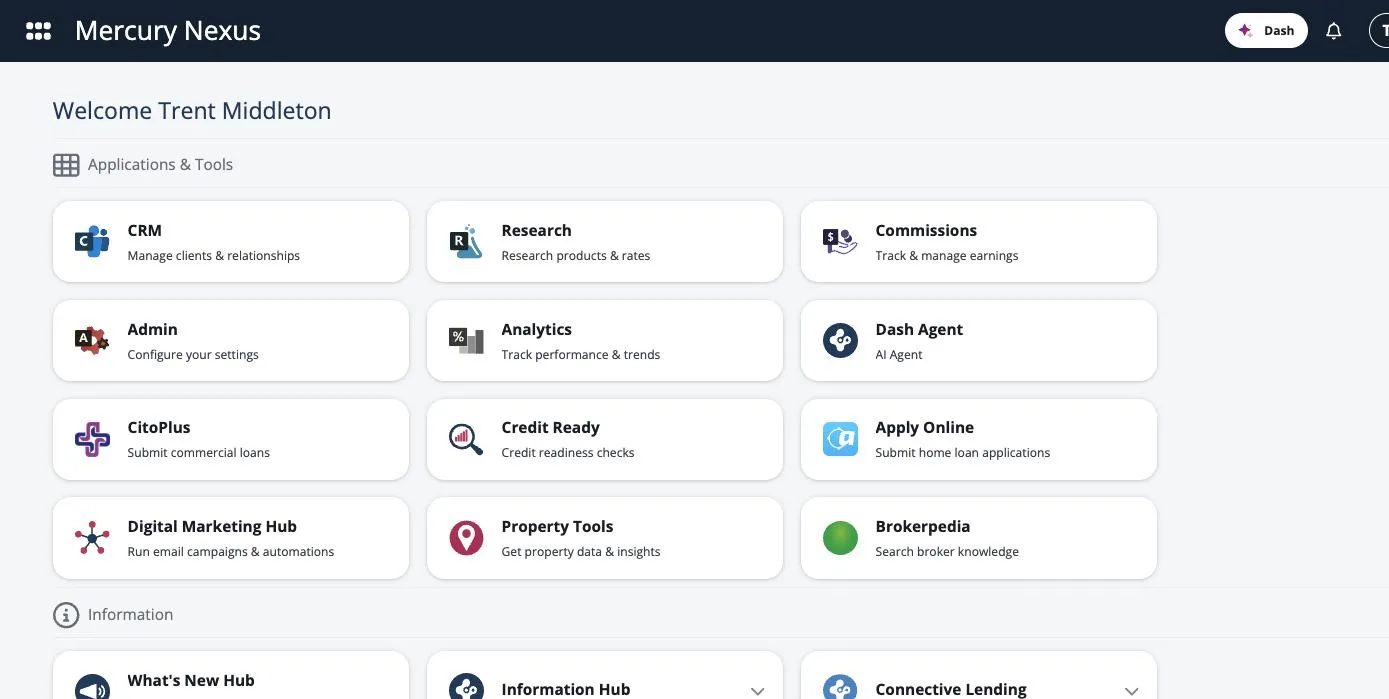
Step 1: Open Admin
- Sign in to Mercury Nexus and select Admin under Applications & Tools.
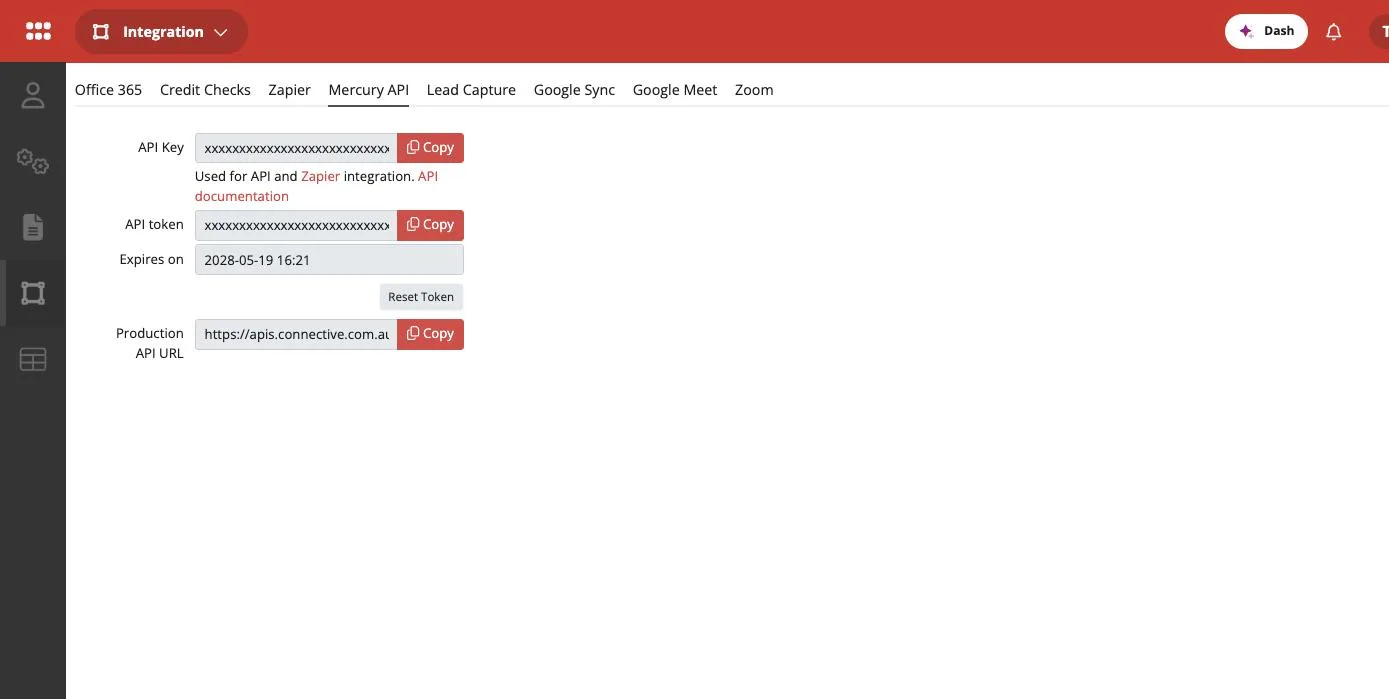
Step 2: Copy your key and token
- Select Integration in the left-hand menu, then the Mercury API tab.
- Use Copy beside API Key, then again beside API token. You'll paste each into the matching field in Lend1 in the next task.
Please note: the token carries an Expires on date. If it expires, or you select Reset Token, disconnect the Connective card in Lend1 and connect again with the new token.
Connect your Connective account
Step 1: Open the connect form
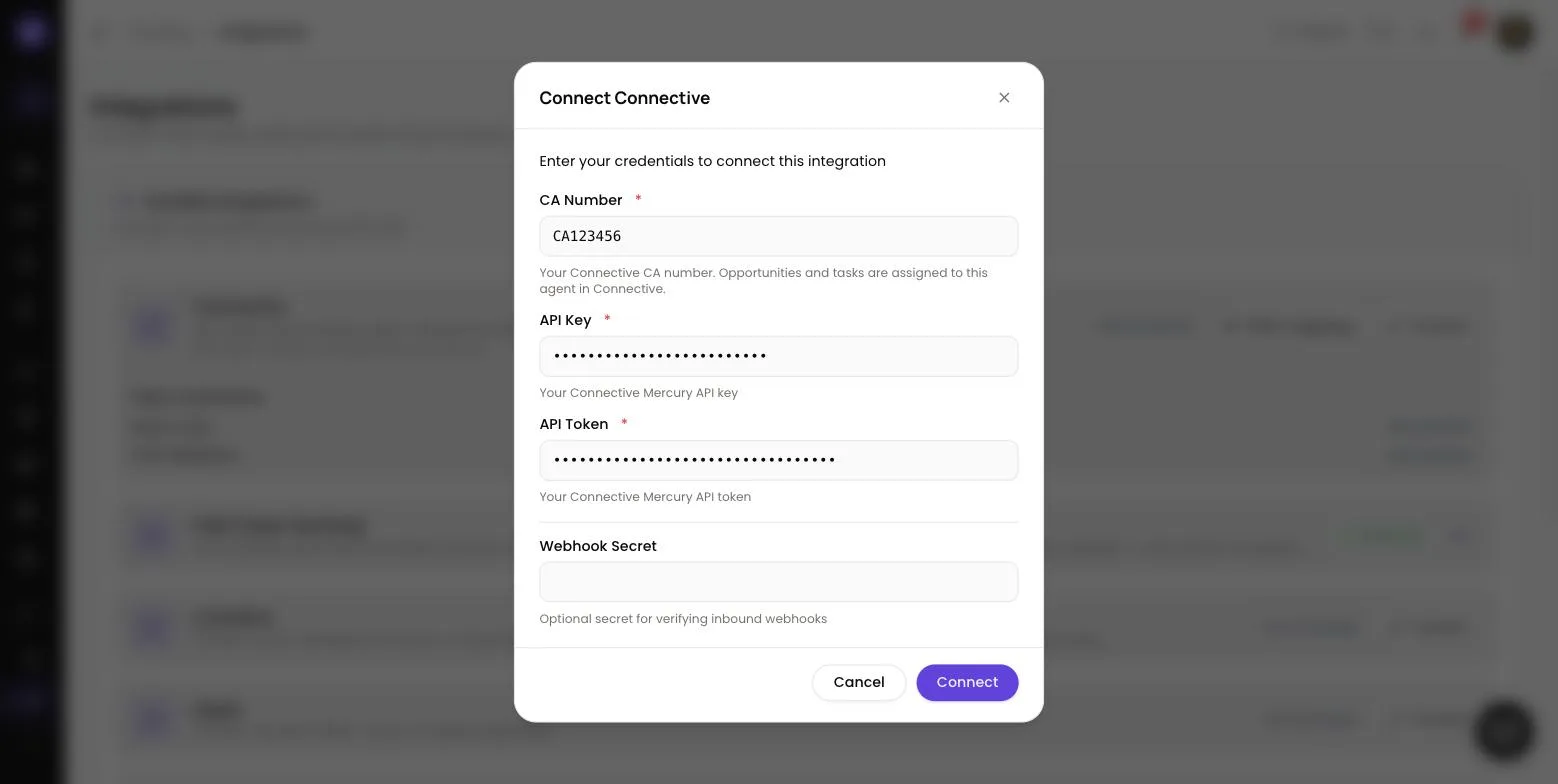
- Select Connect on the Connective row. A dialog titled Connect Connective opens.
Step 2: Enter your CA number and Mercury credentials
- CA Number: your Connective CA number. Opportunities and tasks are assigned to this agent in Connective.
- API Key: your Connective Mercury API key.
- API Token: your Connective Mercury API token.
- Webhook Secret: optional. A secret Lend1 uses to verify changes Connective sends back. Leave it blank and Lend1 generates one for you.
Step 3: Connect
- Select Connect. Lend1 runs a test search against Connective with your credentials, then marks the card Connected with the line "Connected as you." If the check fails, the card shows Error and the reason underneath; correct the key or token and try again.
- Lend1 registers its webhooks with Connective automatically, so there is nothing to set up on the Connective side. The Inbound webhooks row on the card shows Registered once they are in place. If it shows Not registered, select Register webhooks to try again.
Congratulations! Your deals and contacts now sync to your Connective account. The connected card gives you a Stage mappings button, and its menu holds Test connection, View connection and Disconnect whenever you need them.
Please note: your CA number is saved when you connect, and it can't be edited from Settings > Team. To change it, disconnect the Connective card and connect again with the new number.
Map your pipeline stages
Stage mappings belong to your own connection, so each broker sets how their pipeline stages line up with Connective's statuses. Changing yours doesn't affect anyone else on the team.
Step 1: Open your stage mappings
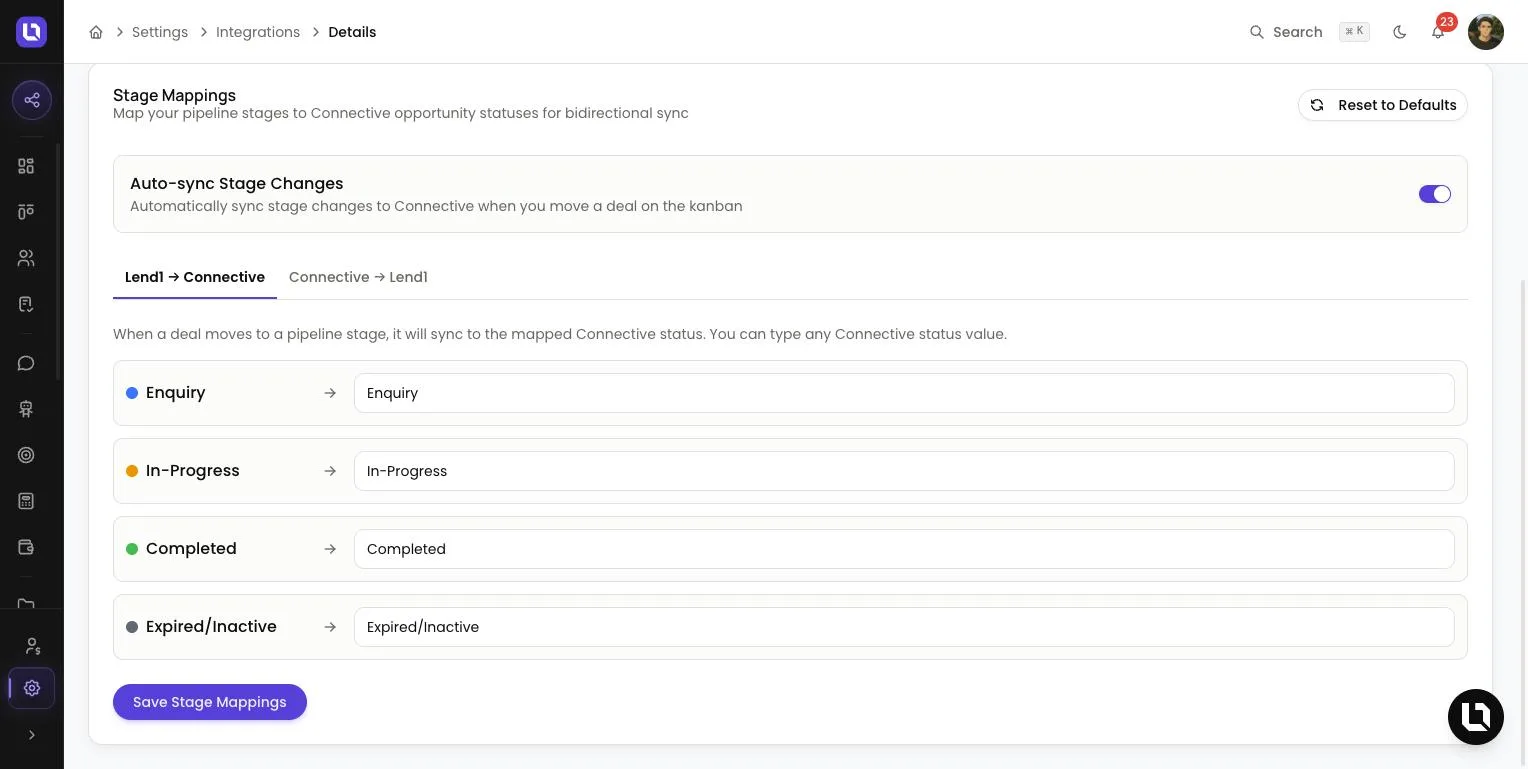
- Select Stage mappings on the connected Connective card. Your connection opens on its Settings tab, with the Stage Mappings card below the Inbound webhooks row.
Step 2: Map each stage
- Lend1's default stages, Enquiry, In-Progress, Completed and Expired/Inactive, match Connective's four statuses one for one. Keep the defaults unless your pipeline uses different stages.
- The Lend1 → Connective and Connective → Lend1 tabs set each direction.
- The Auto-sync Stage Changes switch controls whether moving a deal on your pipeline updates Connective.
- Reset to Defaults restores the built-in mappings. Nothing applies until you save.
Step 3: Save
- Select Save Stage Mappings. Lend1 confirms with "Stage mappings saved".
Turn on document upload
Deal documents travel to Connective through Connective Nexus, which uses a separate sign-in rather than your API key. Lend1 has to register your brokerage with Connective before that sign-in will work, so contact us first if you haven't already. Once your account is connected, a Document Upload (Connective Nexus) row appears under the Connective card.
Step 1: Start the connection
- Select Connect Document Upload. Lend1 sends you to Connective's login page.
Step 2: Sign in as your integration user
- Sign in with the dedicated "Lend1 Integration" user you created and authorise the access it asks for. Connective returns you to Settings > Integrations with the message "Connective Nexus connected successfully", and the row shows Connected.
Please note: if this connection ever lapses, the row shows Expired. Reconnect required. Select Connect Document Upload again to restore it. Your API key connection is unaffected.
Congratulations! Documents on your deals now upload to the matching opportunity in Connective. In the deal's Documents tab each document carries a badge, Sent to Connective, Sending… or Failed with the reason on hover, plus Push to Connective to send one on demand or Retry after a failure. Files up to 10 MB in PDF, PNG, JPG, GIF, BMP, DOC, DOCX, XLS or XLSX format upload. Rejected documents are never sent, and deleting a document in Lend1 does not remove it from Connective.
What syncs, and when
Below is a table of what Lend1 sends to Connective and what triggers it.
| Item | When it syncs |
|---|---|
| Deal and its client | When your client completes their onboarding application. The deal is created as an opportunity and the client as a person linked to it as the primary borrower. |
| Stage changes | When a synced deal moves stage, its Connective status updates to the one in the assigned broker's stage mappings. Each broker can turn this off with Auto-sync Stage Changes. |
| Notes and tasks | As they are created or updated on a synced deal or contact. Tasks only sync when the assignee has a CA number on file, which is entered when they connect. |
| Documents | Automatically after Lend1 AI finishes categorising an upload, or on demand with Push to Connective. |
Changes made in Connective to an opportunity or person come back through the registered webhooks, and a status change in Connective moves the deal to the matching pipeline stage. An opportunity created in Connective arrives as a new deal, assigned to the team member whose CA number matches the opportunity's agent.
Every deal has an Integrations card in its sidebar showing the Connective result: "Synced" with the time, "Not synced yet", or Failed with the reason on hover and a refresh button to retry. If the deal's assigned broker hasn't connected, the card says so instead.
Please note: reassigning a deal to another broker creates a fresh opportunity in that broker's Connective account. The original stays in the first account and stops receiving updates.
For admins: field mappings and your team
Members with Manage Integrations also see Team connections on the Connective card, listing who has connected, and a Field mappings option that opens the field mappings shared by everyone's connection. It is a button on the card until you connect your own account, then it moves into the card's menu. Stage mappings are not shared: each broker sets their own, as described above.
Under Settings > Team, each member who has connected carries a badge with their CA number, such as "Connective · CA123456". A badge reading "Connective · CA number missing" marks a member who connected before CA numbers were collected on the connect form. Ask them to disconnect and connect again to add it.