Updated
Go to Settings > Billing.
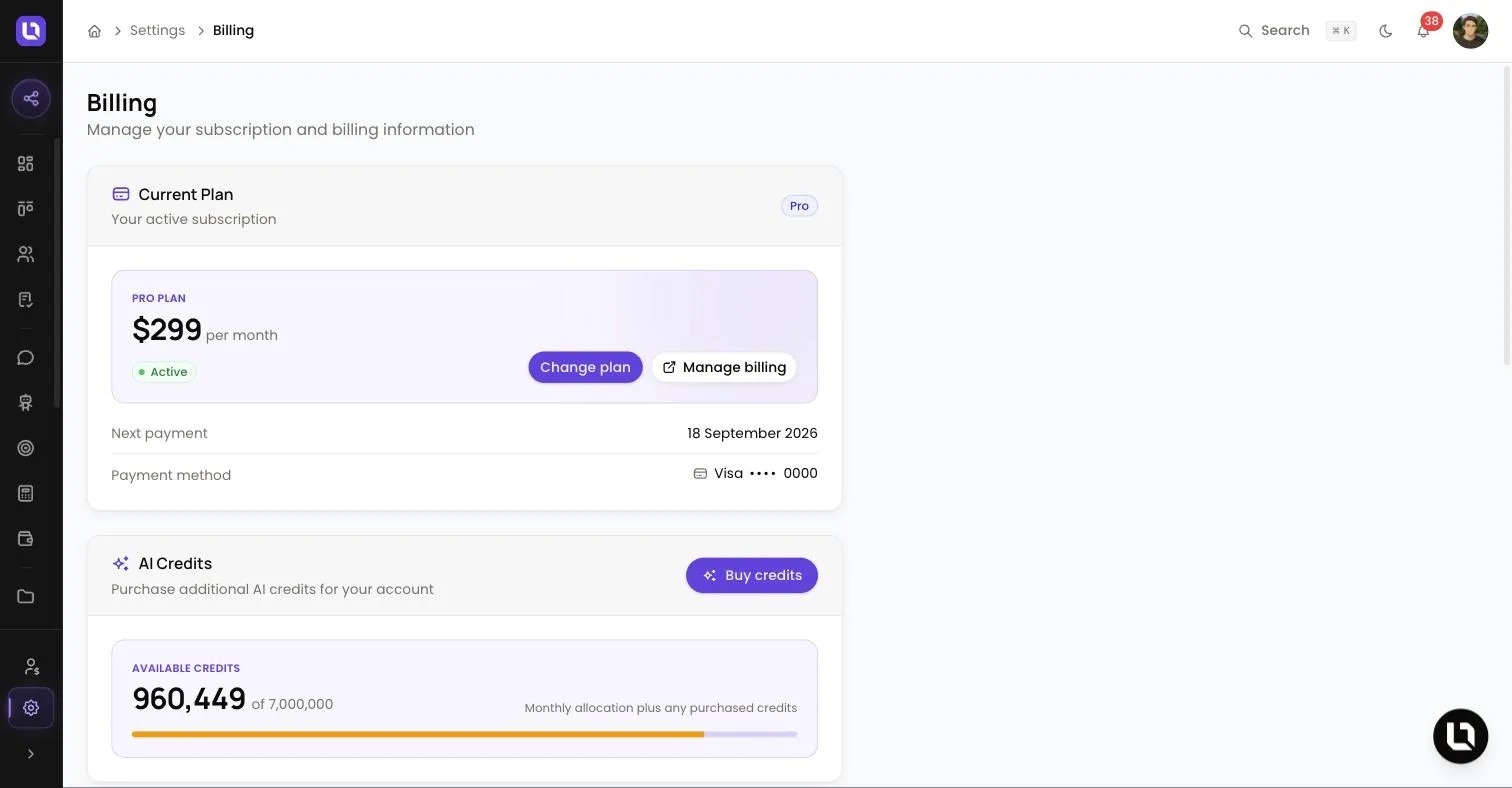
The Billing page shows your plan, your usage against its limits, and the controls to change plan or manage payments. Lend1 is billed as one monthly subscription for the whole workspace, not per team member, and every plan includes a monthly AI credit allowance.
Before you start
- You need the Manage Billing permission. The Admin role has it; the default Broker role does not. An admin can grant it to a custom role under Settings > Roles & Permissions. See Creating custom roles and permissions.
- For current prices, check the Current Plan card and the Change Plan dialog, or the pricing page.
See your plan and usage
Current Plan shows your plan name, its monthly price and a status such as Active, Past due or Cancelled, then Next payment and your Payment method (card brand and last four digits).
Usage This Month has one meter per limit, amber at 80% and red at 95%. A meter shows Unlimited where your plan has no cap and Not included where the plan leaves that feature out.
Below is a table of meters and what each one counts.
| Meter | What it counts |
|---|---|
| Active Deals | Deals that are still open. |
| Team Members | Staff logins, including deactivated ones. Referrers are not counted. |
| AI Credits | Credits used against your monthly allocation plus any credits you have bought. The allocation resets on your billing anniversary. |
| Automations | Every automation, including drafts and paused ones. Templates are not counted. |
| Chatbots | Chatbots you have created. |
| SMS Messages | SMS sent in your current billing period: conversation replies, SMS Copilot, SMS sent by Lend1 AI, automations and task reminders. Login codes, invites and portal links are not counted. |
| Storage (MB) | The total size of the documents in your workspace. |
On the AI Credits card, Buy credits opens Buy AI credits. Purchased credits "are added instantly and never expire."
What each plan includes
Below is a table of plans and what each one includes. These are the standard limits. The Plan Features card and the Usage This Month meters on your Billing page show the figures that apply to your workspace, and those are the ones Lend1 enforces.
| Limit | Starter | Pro | Enterprise |
|---|---|---|---|
| Team Members | 1 | 5 | 10 |
| Active Deals | 50 | 100 | 200 |
| AI Credits per month | 3,000,000 | 10,000,000 | 25,000,000 |
| SMS Messages per month | 50 | 500 | 1,000 |
| Storage (MB) | 1,000 | 10,000 | Unlimited |
| Automations | 5 | 20 | Unlimited |
| Chatbots | Not included | 5 | Unlimited |
| Conversations, Chatbots, Lead Widget, Calculators, Planners | Not included | Included | Included |
All three plans can be selected in the Change Plan dialog. For limits beyond Enterprise, select Contact Sales at the bottom of the Billing page.
What happens at a limit
The Deals, Automations, Documents and Team pages show a usage pill beside their main button, for example "4 of 5 automations". At the cap the pill shows a crown.
When you try to add one more, Lend1 opens Plan limit reached instead of the form: "Your plan includes 5 automations, and all of them are in use." With Manage Billing, select Upgrade plan to go straight to the plan picker. Without it, the dialog says "Ask an admin to upgrade your plan to add more." The Deals page is different: at the active deals limit, New application opens Clean up active deals instead.
To get past a cap, upgrade, or bring your usage back under the limit. When a meter passes 80%, and again when it reaches its limit, Lend1 emails an admin of your workspace.
Please note: adding a referrer is blocked while Team Members is at its cap, even though referrers don't use a seat.
What a locked Pro feature looks like
On Starter, Conversations, Chatbots, Lead Widget, Calculators and Planners stay in the sidebar, dimmed, with a crown. Opening one shows a page headed Included in Pro and Enterprise with a What you get list and an Upgrade to Pro button. Without Manage Billing you see "Ask your account admin to upgrade your plan."
<!-- screenshot pending: billing-locked-pro-feature.webp (a locked Pro page on a Starter workspace, showing Included in Pro and Enterprise, What you get and the Upgrade to Pro button) -->Change your plan
Step 1: Open the plan picker
- On Current Plan, select Change plan. In Change Plan, yours is marked Current. Select Upgrade or Downgrade on the plan you want.
Step 2: Review and confirm
- Check What changes, which lists each limit and feature that moves.
- For an upgrade, Charged today (prorated) is what your saved card is charged now. For a downgrade, "A prorated credit for the rest of this period will be applied to your next invoice."
- Select Upgrade to Pro (or the plan you chose). The change is immediate, so after a downgrade, features the new plan leaves out stop working straight away.
- If your card is declined, Lend1 shows the error and opens the billing portal so you can update the card.
Congratulations! You see "Switched to Pro." and your new limits apply at once.
Update your card, find invoices or cancel
Lend1 doesn't list invoices or offer a cancel button in the app. On Current Plan, select Manage billing to open the Stripe billing portal, which holds your payment method, invoices and subscription.
- If a payment fails, staff with Manage Billing get an in-app notification and your business email gets a message. Lend1 shows Your subscription needs attention: select Manage billing on Stripe and update your card. If the payment is still failing 7 days after the first attempt, the workspace is suspended.
- If you cancel, the Billing page shows "Your subscription will cancel at the end of the current billing period" and Access until with the date.
- Once a subscription has ended, your team can still log in but lands on Reactivate your subscription, and changes are blocked with "This portal is currently view-only." Choose a plan and select Reactivate subscription to restore access.