Updated
Go to Onboarding Portal in the sidebar.
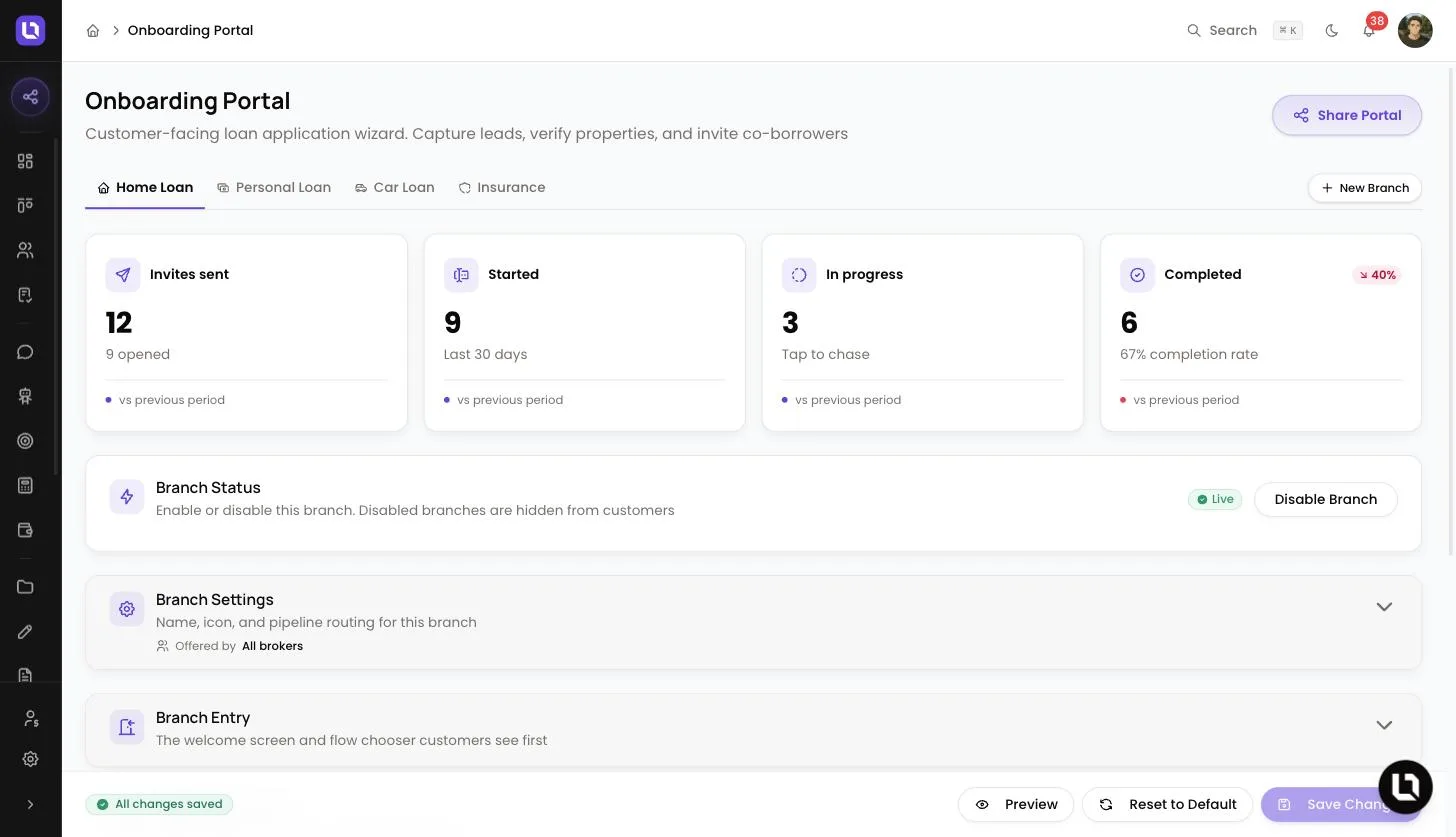
The Onboarding Portal page controls the application your clients fill in. It is organised into branches, one tab per finance type, and each branch holds one or more application flows made up of steps. Your workspace starts with a Home Loan branch that is ready to use.
Before you start
- This page is available to the Admin role. If you don't see Onboarding Portal in the sidebar, ask an admin to make the change for you. The role editor under Settings > Roles & Permissions does not list the Onboarding Portal permissions, so they can't be added to a custom role there.
- Logos and brand colours are not set here. They live under Settings > Branding. See Setting up your branding and custom domain.
How the page is laid out
Each branch has its own tab along the top. Drag a tab to reorder the branches; your clients see them in the same order when they choose what to apply for. Under the tabs, a row of tiles shows Invites sent, Started, In progress and Completed for the last 30 days.
Below is a table of the sections on each branch and what each one is for.
| Section | What it is for |
|---|---|
| Branch Status | Turns the branch on or off with Enable Branch and Disable Branch. An enabled branch shows a Live badge. Disabled branches are hidden from clients. |
| Branch Settings | The Branch name, Customer description, Icon, and Deals created go to, which sets the pipeline stage new deals from this branch land on. |
| Branch Entry | The Welcome screen (title, description, bullets and button label, with a Show welcome screen switch) and the Flow chooser heading. The chooser appears automatically when two or more flows are enabled. |
| Application Flows | The flows in this branch and the steps inside each one. |
| Thank You Message | A custom message shown after the application is completed. |
| Reminders | Automatic follow-up emails when someone leaves an application unfinished. Switch on Enable reminders, then select Add a reminder for up to 5 emails. If there's still no reply 2 days after the final reminder, the application is marked inactive. |
| Broker Links | Each team member's personal onboarding link, with a copy button, and the branches that person offers. Changing the branches also needs the Manage Team permission. |
Edit the steps in a flow
Step 1: Open the flow
- Select the branch tab, open Application Flows, then select the flow you want to change. The Home Loan branch includes First Home Buyer, Refinance and Cash Out flows, and a Co-Applicant flow used for co-borrower invites.
Step 2: Change a step
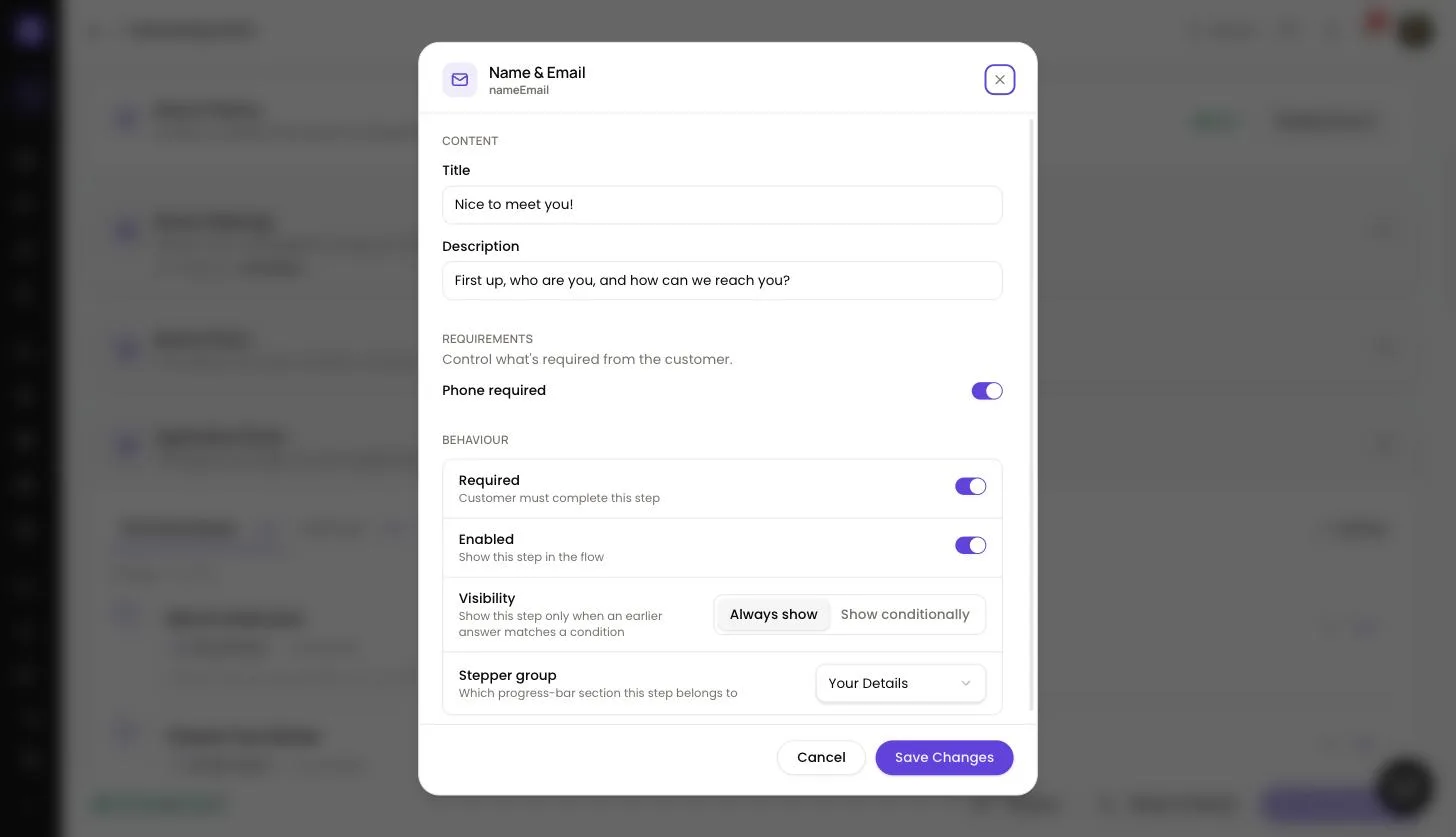
- Select Configure on a step. Under Content, edit the Title and Description your client reads. Other settings depend on the step type, for example Answer options or Amount limits.
- Under Behaviour, set whether the step is Required and Enabled. Under Visibility, choose Always show or Show conditionally to show the step only when an earlier answer matches a condition.
- Select Save Changes to close the step.
Step 3: Add, reorder or remove steps
- Select Add Step to open the Step library. Browse by category (Bundles, Questions, Customer details, Documents, Structure & legal) or search, then select Add to flow.
- Drag a step by its handle to move it. A step that depends on an earlier answer stays below the step it depends on.
- Open the menu on a step to switch Visible off, which marks it Hidden without deleting it, or to choose Delete Step. A step can't be deleted while another step's visibility condition depends on it.
Please note: to manage whole flows, select Add flow, or open the menu beside a flow tab for Disable Flow, Rename and Remove Flow. At least one application flow must stay enabled, and the co-applicant flow on the Home Loan branch can't be disabled or removed.
Preview and save your changes
- After an edit, the bar at the bottom of the page shows Unsaved changes. Select Save Changes to apply your edits, or Discard to drop them.
- Select Preview to open Preview Flow. It shows the current unsaved draft of the flow you have open, with Desktop and Mobile views, Refresh preview and Open in new tab.
- Reset to Default replaces the branch's flows with the default steps after you confirm. This cannot be undone.
Please note: creating, archiving, restoring, deleting and reordering branches, and changes under Broker Links, apply straight away without Save Changes.
Add a branch for another finance type
Step 1: Create the branch
- Select New Branch. Enter a Name, a Customer description and an Icon.
Step 2: Choose a starting point
- Under Start from, pick Template, Clone existing (a copy of another branch's flows) or Blank (contact capture and a thank-you only). Select Create Branch.
Step 3: Build it, then turn it on
- New branches start disabled so you can build the flow before clients see it. When it's ready, select Enable Branch under Branch Status, then Save Changes.
To retire a branch you created, open Branch Settings and select Archive Branch. New applications stop, and applications already in progress finish normally. An archived branch offers Restore Branch and Delete permanently. The Home Loan branch can't be archived or deleted.
Share your portal
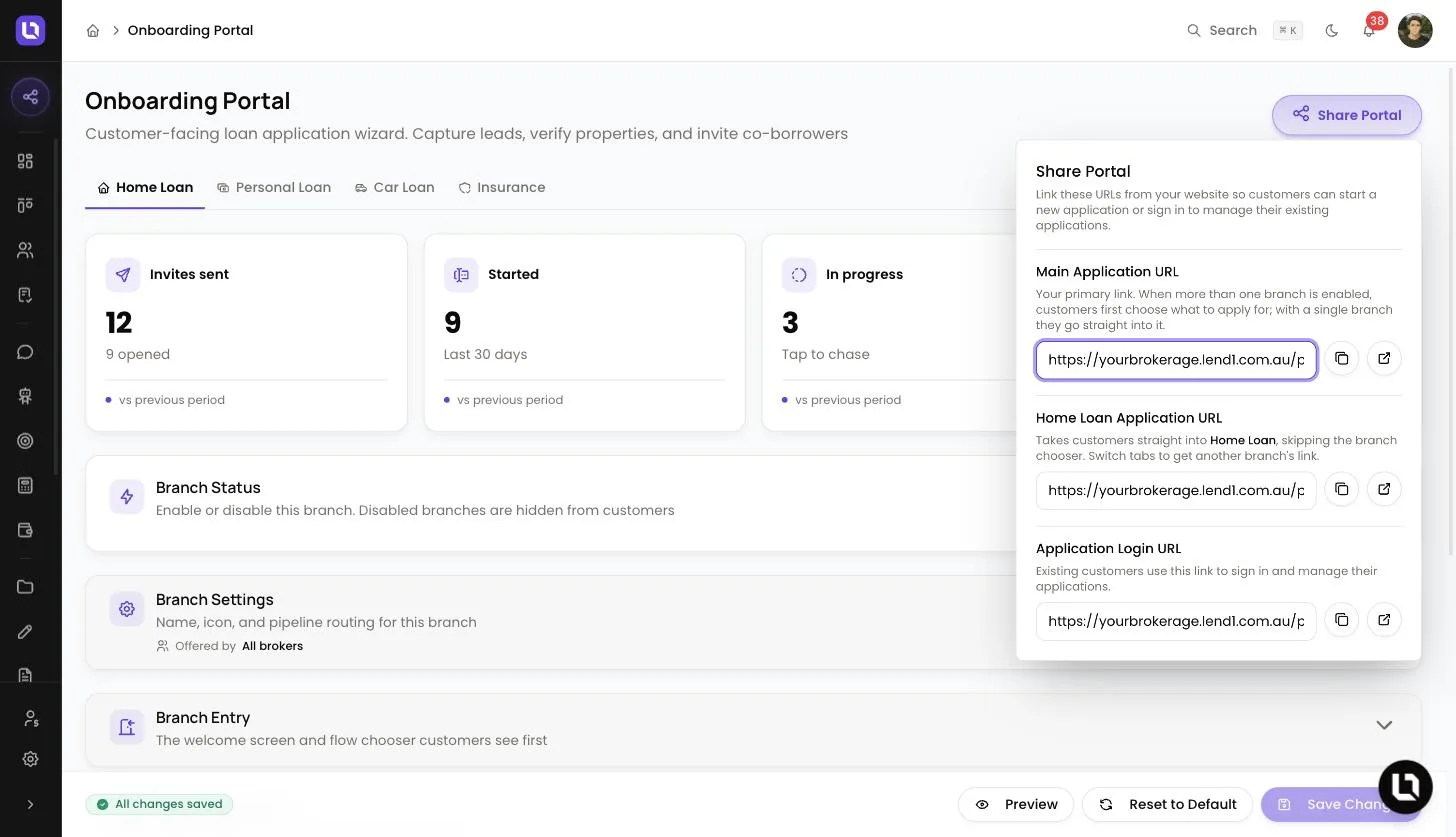
Select Share Portal. Each link has a copy button, ready to add to your website.
| Link | What it does |
|---|---|
| Main Application URL | Your primary link. With more than one branch enabled, clients first choose what to apply for; with a single branch they go straight into it. |
| Application URL for the open branch | Takes clients straight into that branch, skipping the chooser. Switch tabs to get another branch's link. |
| Application Login URL | Existing clients use this link to sign in and manage their applications. |
Congratulations! Your Onboarding Portal asks the questions you want, and your links are ready to share.